
一、总体框架
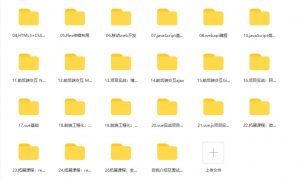
安装好vue-cli后的项目结构如下,其中src文件夹是需要重点掌握,其余了解即可。
我的文件夹目录如下:

项目目录结构的整体解释图:

二、配置目录文件讲解
1、build目录(webpack配置)

2、config目录(vue项目配置目录)

3、node_modules(项目依赖包)
node_modules里面是项目依赖包,其中包括很多基础依赖,自己也可以根据需要安装其他依赖。安装方法打开命令工具,进入项目目录,输入npm install [依赖包名称],回车
在两种情况下我们会自己去安装依赖:
》项目运行缺少该依赖包
》安装插件:如vuex
PS:有时会安装指定依赖版本,需在依赖包名称后加上版本号信息,如npm install vue-loader@11.1.4
三、src项目核心文件讲解
核心文件目录前面已经说明了,下面重点讲解index.html,main.js,App.vue,router的index.js,HelloWorld.vue
1、index.html(主页)
index.html为项目的主页,跟其他html一样,但一般只定义一个空的根节点,在main.js里面定义的实例将挂载在根节点下,内容都通过vue组件来填充。说明如下:
<!DOCTYPE html>
<html>
  <head>
    <meta charset="utf-8">
    <meta name="viewport" content="width=device-width,initial-scale=1.0">
    <title>my-vue-demo</title>
  </head>
  <body>
      <!-- 定义的vue实例将挂载在#app节点下 -->
    <div id="app"></div>
  </body>
</html>
2、main.js(入口文件)
main.js为项目的入口文件,即单入口,主要是引入vue框架,根组件及路由设置,并且定义vue实例,说明如下:
// 引入vue框架
import Vue from 'vue'
// 引入根组件
import App from './App'
// 引入路由配置
import router from './router'

// 关闭生产模式下给出的提示
Vue.config.productionTip = false

// 定义实例
new Vue({
  el: '#app',
  router,
  components: { App },
  template: '<App/>'
})
3、App.vue(根组件)
一个vue页面通常由三部分组成:模板(template)、js(script)、样式(style),说明如下:
<!-- 模板 -->
<template>
    <div id="app">
        <img src="./assets/logo.png">
        <router-view/>
    </div>
</template>

<!-- js代码 -->
<script>
export default {
    name: 'App'
}
</script>

<!-- css样式 -->
<style>
#app {
    font-family: 'Avenir', Helvetica, Arial, sans-serif;
    -webkit-font-smoothing: antialiased;
    -moz-osx-font-smoothing: grayscale;
    text-align: center;
    color: #2c3e50;
    margin-top: 60px;
}
</style>
【template-模板】
(1) 模板只能包含一个父节点,也就是说顶层的div只能有一个(如上图,父节点为#app的div,其没有兄弟节点)
(2)<router-view/>是子路由视图插槽,后面的路由页面都显示在此处,相当于iframe
【script-JS代码】
vue通常用es6来写,用export default导出,其下面可以包含数据data,生命周期(mounted等),方法(methods)等。
【style-CSS样式】
样式通过style标签<style></style>包裹,默认是影响全局的,如需定义作用域只在该组件下起作用,需在标签上加scoped,<style scoped></style>
引入外部CSS示例:
<style>
    import './assets/css/public.css'
</style>
4、router(路由配置)
router文件夹下,有一个index,js的路由配置文件,说明如下:
// 引入vue框架
import Vue from 'vue'
// 引入vue-router路由依赖
import Router from 'vue-router'
// 引入页面组件,命名为HelloWorld
import HelloWorld from '@/components/HelloWorld'

// 使用路由依赖
Vue.use(Router)

// 定义路由配置
export default new Router({
  routes: [
    {
      path: '/',
      name: 'HelloWorld',
      component: HelloWorld
    }
  ]
})
5、HelloWorld.vue(页面组件)
最熟悉的程序开发语:打印HelloWorld输出如下:
<template>
  <div>
    <!-- 输出变量 -->
    <h1>{{ msg }}</h1>
  </div>
</template>

<script>
export default {
  // 定义页面名称,可以不要
  name: 'HelloWorld',
  data () {
    return {
      // 定义变量
      msg: 'HelloWorld'
    }
  }
}
</script>

<style scoped>
h1 {
  font-size: 16px;
  font-weight: normal;
}
</style>


![WordPress网站&子比主题模板美化教程汇总篇[已更43]-大雄搜集站](https://soujiz.com/wp-content/uploads/2022/07/20220730131246-300x132.jpg)


![表情[tu]-大雄搜集站](https://soujiz.com/wp-content/themes/zibll/img/smilies/tu.gif)
![表情[bishi]-大雄搜集站](https://soujiz.com/wp-content/themes/zibll/img/smilies/bishi.gif)

暂无评论内容